Sunday, April 22, 2012

Dining Room Delight!

Well.... long time no see... haha! I couldn't wait to post about the dining room makeover! I absolutely love this room now! 


Before..... poop brown on bottom and baby vomit green/brown(came color that was ALL OVER the house when we moved in! BLEH!).... pretty ugly... pretty boring.... not attractive.... and looked dirty, closed in and overall just not pleasant. 


Well of course that couldn't do for us... I wanted a much lighter, much more delicate look in my dining room, one that was much cleaner looking and much more inviting for company...


I post this picture to shoe you all what we are dealing with.... as you can notice some old paint ripped off with the light cover... yes... whomever painted this out before not only used cheap nasty colored and overall horrible paint, but also put the switch covers on before it was fully dry... we had to pry them all off with a screw driver.... this is real life people!!!!


Anywho, gathered everything in the center to keep it from getting covered in paint!


Step one.... cover molding and bottom part of wall in an ivory creamy white.... this took three coats and come spots I still need to/have touched up. The poop brown was hard to cover! 


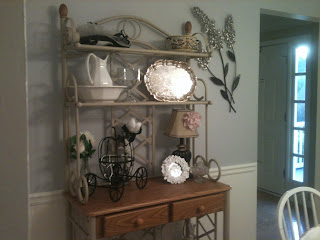
Step two, grey on top!!!! Step three Hang pictures/set everything up! Keep in mind people we are still working with what has been given to us! We cannot afford new furniture at the moment!  Bakers rack was from my Mimi, its perfect in this space and I love how it turned out!


A little cheap wall art from photos we have, dollar tree frames and Wal-Mart prints, who project: $15.00 


Shadow box made from wedding memories, and a new better home for out unity candle and table. I just love our Unity Candle, I feel like its too pretty not to be on display somewhere at least for a little while!


Overall collage of the whole thing... I LOVE it! 


Another angle... 


new table and chairs from my parents, they are such a blessing and have given us so much, we are so thankful!!  It goes perfectly! I will eventually resurface them with an old barn distressed grey look, but they look great for now! 


Overall still a few tweaks and details to be finished and a China Cabinet to find... hoping we can get a good deal on one at a yard sale this summer that I can resurface and not feel guilty about it! With what we have to work with I'm very very pleased with this room currently! I eventually want to get a new light fixture and move this current one into another room, but again... I will take it as it comes! :) Hope you all enjoyed the post and the new dining room as much as I enjoyed doing it! Hope to have you over soon to see it in person!

Farewell and God Bless!  


Curing Period OVER!

Well Hello all again, The Curing Period is now over for the kitchen so I thought I would update you with a few pictures! Well Here it goes: 


I absolutely adore my mixer, probably one of my favorite wedding gifts and probably by favorite part of my kitchen! 

 I just love my Snow White salt and pepper shakers, so vintage and also an awesome sneaky way to sneak Disney into the decor! ;-)


 Coffee Central Station as I like to call it... very important part of the kitchen!


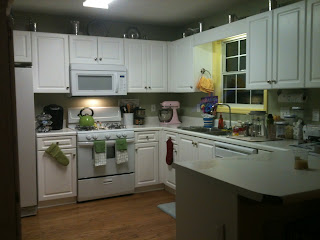
 Wide angle view of everything so far. Still need some tweaks (like painting the bottom of the Island pink and the pantry blue), but we're getting there slowly but surely!


Kitchen in Action, baked a cake for my Mother-in-laws birthday celebration tomorrow, Oreo Cream... we shall see tomorrow how it really turned out! 


Love this adorable Wire Form for my Apron, another wedding gift favorite from two of my favorite Hostess'! 


Another wide view, gives you a little better perspective of how the kitchen is laid out etc. 


Puppy Dog corner..... complete with paintings! 


Well I hope you like it as much as I do so far! Cannot wait to get the rest completed!  Now onto.... THE DINING ROOM!!!  I think it deserves its own blog post though so... for now.... farewell!  :) 

Saturday, March 24, 2012

Giani Granite: Review

Hello all!! Sorry it has been SO long sense my last post, but we have been very very busy! This post is going to focus on a process and review of the Giani Granite (go to www.gianigranite.com or Giani Facebook for more product information) product I used to resurface my counter tops. Lets dive right in shall we?

First lets start with the ORIGINAL original Kitchen.... yes I'm talking way back "bought the house" kitchen that was dingy, water damaged and discolored.


Pretty bad huh? Yes I know, but I saw what potential it had SO we bought the house and I made it my sole mission to complete this Kitchen Tune Up project FIRST! Here was the progress before Giani (and the new Kitchen Island :-D). Kinda cluttered due to having and overwhelming blessing of too many wedding gifts, but we were working through it to make sure everything had a place that wasn't on the counter tops!


Oh, and side note/pause break. WE HAVE A WONDERFUL NEW ADDITION TO THE FAMILY!!!! This is Zeus, our new (then 10 week, now 12 week old) Husky! Apollo and we fell in love with him at first sight and although not formally planning another addition so soon, we felt like it was the right move. Apollo is so happy and loves his new brother so much!

As you can see... they play... ALOT. (;-D)


So cuddly and best friends already!
Here is a side by side of both of them at 10ish weeks!

Okay, now back to the real purpose of this blog post. Giani Granite. I heard about Giani from the a blog/facebook I follow My Repurposed Life. She's got some great ideas and very friendly, I highly recommend following her if you are a DYIer. I had my speculations about the product considering it is just paint and all, but i read through all the reviews and checked out youtube videos of how to use the product and the good seemed to outweigh the bad. I figured sense My Repurposed Life recommend it as well it had to be worth a shot. I hate my white counters so badly and the white in the kitchen was just overwhelming I had to do something.

I picked the Diamond White kit from Giani.com and I paid about 79.99 including shipping for the kit. The Kit came with all below. All the mineral paints and sealer, two roller attachments, one roller, and a sponge.

This is the rest of the materials I had to buy to complete the project. Some of it was optional, but I went ahead and did everything recommend by Giani.

First things first was to clear the counter tops of all that graced them and clean the thoroughly with a household cleaner, they recommend SOS so I used SOS. Found out I really like SOS and how well they clean, so I will be using these in the future! They recommend SOS because it had grit and gets all the grease and dirt out and off your counter tops so your base minerals will adhere completely.

Nice (and much needed :-X) scrub down!


Look how shiny and WHITE they are...

Here is a nice view of the new kitchen "island" as well. Its a butting station that has extra storage and everything! My grandmother just had it in her attic!! SO blessed and lucky!

Next step was to fill any grooves or dents in the counter tops with "wood patch" and let it dry and adhere the surface back together.

Once it was done drying you sand it down smooth with the counters with 600 grit sandpaper. I could only find 400 grit and it worked just fine and didn't "scratch" the finish! Although if you can find 600 grit, use that it will probably be even safer!

Next step was to remove any old caulk. This was the only place my kitchen even had it so I removed it.

Next: tape everything off. They recommend Frog Brand Painters tape (although I think any brand painters tape would do just fine) but I bought the Frog Brand and it was green, which was weird but whatever! Haha!

Finally you are ready to start painting! You first roll on the base black mineral paint. It actually on its own is really pretty. I rolled is exactly how the videos showed and tried not to over roll or under roll!


After you get the bottom coat all on you wait 8 hours or longer for drying before moving on. They whole project takes about 3 days total to complete.

The next step (and I'm so mad at myself for not getting pictures of like half way done sponging, but I was working to diligently and didn't think about it!) is to sponge on each color. The kit has them label: Step2 A, Step2 B, and Step2 C so you know which to sponge when. Its really up to your preference because they give you the same amount of all the paint. I wanted a more Grey White feel so I did not sponge a lot of Step2 B for me which was a brown/taupe color. I did do a little just to give it some dimension.


Here is a close up so you can see some Veining that I did. I used the black base coat (what I had left over) to create what they call Veins in the design. This, in my opinion, makes the whole thing look more real and natural.

Last, but not least is the top coat. It is a shiny white glaze/sealer that you roll on two coats of, 4 hours apart to create a glassy finish, just like granite.

Here is a before and after side by side for you.
After removing the tape, but before re caulking. (re caulking is the last step to everything)
All in all here are my ratings:

Cleanliness: Not the cleanest project in the world, but that doesn't bother me. Just beware when you sponge, it will get on you. There is not way around it so were clothes that are old and work clothes that you don't mind getting paint on.

Simplicity: All in all this for my was not hard at all, but you can make it as hard or easy as you like. I probably made it harder on myself with doing the veining, but for me (having gone to art school) veining was not hard at all, for others it might be. I would rate this project extremely simple, I personally think anyone can do it and make it look great!

Visual Appeal: If you like granite or stone, you will love the way your counters look after using this product. I LOVE mine, so much character now then before, plus I would have to imagine it would add some house value as most people would think it was granite just by looking.

Labor Intensiveness: This project is not super labor intensive but it is a little, and it is very time consuming. It took me about 2-3 hours to sponge the top layer on and get the veining right. PLus about 30 minutes per bottom and top coats. If you add in prep work and drying time you are looking at like 65-70 hours roughly for the whole project. Thats at least three days. Plus you have to keep your counters clear of any heavy items such as mixer/microwaves/coffeepots for 2 weeks (my husband hates this part).

Durability: I think this is going to be very durable. It seems think and the hard top coat is very think and hard. I do not foresee (unless someone takes a knife to my counters) it shipping anytime soon. PLus if it does just bring out the extra paint and touch it up.

Overall: I would highly recommend this product to anyone wanting a cheaper way to redo counters. I enjoyed the process and LOVE the result. Everyone thinks I got granite countertops put in! Cost to benefit ratio is off the charts good. Low cost and HUGE benefit. I love my kitchen now where before I hated going in there or showing people the house because of it.

Well I hope you enjoyed it. We are still in the 2 week curing time so once that is over and we put everything back together I will post pictures of everything complete. We are also planning (at some pint) to tile in the backsplash with subway white glass tiles, but that might be further down the road. Next project... finish painting the dining room! :) Knocking out this "fixer-upper" one room at a time! :)

Love and God Bless to all!

Sunday, February 19, 2012

Dingy Kitchen.... Clean it up!

Hey All!! I hope everyone has had a great week! I know this week has been a rough one for Jared and I but we made it through and are praising God for making us stronger then we were last week! God never ceases to amazing and strengthen in a weirdest and most wonderful ways! Any who, I figured sense we are both home sick from church this morning [ :-( ] I would take this time to update all who care about the current, and most recent projects we have been working on! I am happy to report (to my knowledge) we have kept up the closet organization from last post! [ :-D ]

Also THE FENCE IS FINISHED!!!! And it looks amazing! Props to Jared, Jared, Josiah, Mr. Mike, Derek and I think Jason helped too! Also thank you Jeanie for letting us use your saw! And Tristan, Ms. Ellen, and Jeanie for letting us borrow your husbands for a few weekends! We greatly appreciate all the help we have in the network that surrounds us. We are totally blessed and we know it! :) Here are a few Pictures, just in case I didn't get the finished product up in the last post I made (I don't remember if I did or not and I'm not 100% sure how to back out of here without loosing all the pictures I just uploaded, so better safe than sorry!)


Doesn't it look great?? Next for Jared's list of Projects a DOGGIE DOOR! :) Apollo is one lucky pup if you as me! :)


No onto bigger and better things..... the kitchen. It is still currently in some major need of work, but I have some ideas and a priority list ready to go! First thing was first, I could NOT stand looking at the "dingy" "discolored" "water damaged" and "ugly" cabinets any longer. The kitchen (although bleached MANY times before and sense we have moved in) just did not look clean. I am a weird person about any kitchen. If I think its dirty by the looks of it, it is VERY hard for me to eat food that came from it. I, and I'm not sure who else because everyone was too nice to tell me if they did, felt like my kitchen was one that if I came over as a guest, I would not have eaten the food out of it by the looks of the kitchen. I, of course, knowing how, and how often I clean the kitchen knew it was however despite the looks of it, clean and sanitized. With all that said, the current state of the kitchen cabinets had to GO. Here is a glimpse of the "before" pictures if the cabinets:

Here is just a wide angle "before" picture. As you can see the cabinets are a faded and dingy color next to the new all white appliances. You cannot see the water damage on the doors from this far out but below you'll see a close up of just how much damage we are working with...

This door just came off in our hands one day. It was being held on by ONLY glue. Yep, glue.

Most of the cabinet doors were in this shape or worse....

Apparently the people who live here before either had a dog they let chew on all the cabinets, or left water standing on them all the time. Sadly enough, we do not have the money to replace all these doors, but we do have craft, skills, and determination to at least make them look better. Here is where we started. We removed all the doors and laid them out on the back porch for sanding. (I got an electric sander, did I tell you? I love it!!! ) As you can see from this picture not all the cabinets were even the same "dingy faded color"!!!!

Funny Picture, here is what my kitchen would look like with NO doors! Haha!

Eventually when we can afford new doors, I want the cabinets on the far right of this picture to have glass panes so you can see the pretty colorful dishes through them! Add some more color and fun to the kitchen!

After sanding it started to rain so we moved all the doors into the garage for priming and painting, the whole process form start to finish took us a little over 48 hours.

Allowed time to dry...Then applied second coat....
While the doors were drying I decided all the white in the kitchen would make it very, well... white. And if you know me I am a HUGE fan of color, and sense we were working towards a "colorful retro throw back kitchen" I thought it would be a good idea to being a "pop" of color into a place that wouldn't normally be examined for anything other than the standard white trim color. The window seal!
I decided I wanted a bright but subtle yellow with a white crackle underneath. Add a little "age" and depth (as well as son visual interest) to the kitchen itself.

I love this crackle paint, you can get it at any craft store and even Wal-Mart. It is what I used to crackle and age all the signs and stuff for the wedding. Its a clear shiny coat that you put on in-between the first color and the second color.
Once you put the second color on you have to work fast because if you go back over the same spot the paint will peal up and look weird. I am very please with out this project turned out! Here is a close up of the "crackle" texture on the seal .

The color looks very bright in this picture when in reality it is more like the picture about. A much softer Subtle yellow, but bright enough to be noticed.

Once drying was done it was time to put the cabinets back on! My Hubby has been such a help in this project! I could not have done it without him!
Here are a few "before and after side by sides I put together for a Facebook Mini Album Im doing. It give you a good Idea visually what an upgrade the kitchen has had.
Drawer Door is back on! [:-D]
The Cabinets look TONS better and cleaner due to the sanding and priming. But they will never look new because the material was not made to be sanded, or to be damaged like it was for that matter! I wish it looks more like new, but from a distance you cannot even tell anything is wrong so I am pleased with the outcome and totally able to live with it until we can get new doors!
This before and after really shows the dramatic different the color has made in brightening up the whole kitchen!
Same with this one!
Below are just a few more "After" Pictures I thought you might enjoy!

Using stuff from the wedding to temporarily decorate with!


The kitchen Island is on its way, and I cannot wait to get it in there! Also the pantry will be painted a subtle grey blue color and the backsplash will eventually be tiled in with a sparkly white tile. BUT those are all on the back burner for now as the COUNTERTOPS are the next big thing for the kitchen for me. I am going to use Giani Granite, a durable countertop paint, to transform them from boring white laminate to a white and grey marble/granite stone look. I am very excited about this project and itching to get started! I am going to see if Jared will let me order the kit today!!! Its very price affordable and from the finished products I see online from real people it working amazingly! I cannot wait to try it, so stay tuned for before, during, after and a review of the product for next time! :)

As always thanks for reading and being interested in the remodel! As always any tips, suggestions, or questions are always welcome! Love to all!

In the spirit of Valentines Day this is one of my favorite verses regarding love! You are Loved!

This is love: not that we loved God, but that he loved us and sent his Son as an atoning sacrifice for our sins. - 1 John 4:10